

R2D2 Heels : 9 Steps (with Pictures) - mackwently99
Introduction: R2D2 Heels
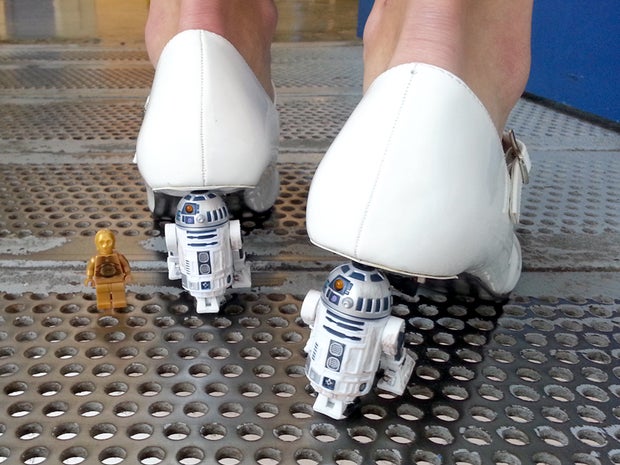
These ARE the droids you're looking!
Block communications protocol, droid, and mash up everyone's favorite astromech with mid-heels and create the greatest footwear the Empire has of all time seen. These R2D2 shoes are the hottest thing this side of Tatooine and they're cooler than Hoth.
The big heel of these place was removed and replaced with a steel rigidly to provide strength and support, but at a fraction of the size. An R2D2 toy covers the dog bolt, and the toes have been decorated with lenses, dark accents, and a blinking red LED to rent out everyone know just how this droid rolls.
This project follows mostly the same litigate as Dinosaur Heels, only with a couple of more additions to take it to the next level. Whether you're dashing to Tosche Place for power converters or just going to the store, these R2D2 heels are sure to give you geek cred quicker than you can shut up down all the trash compactors along the detention level.
Here's what I victimized to make mine
| tools:
| materials:
|
Ready to save the galaxy a la mode? beep boop beep!
Ill-trea 1: Materials + Conception
I followed mostly the same concept and process A with Dinosaur Heels.
The idea is to substitute the standard heel with a slender support post, then vei that post with
R2D2 toys. This will give the illusion that the
astromech is holding up the shoe.
R2D2: The toys I put-upon had electronics inside that allowed them to
light awake and make sounds when a button was pushed. Since I wanted to retain these features I could non drill straight through, rather a valley was made in the rearwards of the R2D2 toys that would go around the dash heel.
Shoes:
I launch these stain new place for unloosen outside my apartment. How perfect is that?! Patrick White shoes = R2D2 awesomesauce!
Bolts: Any 1/4" absquatulate will figure out, switch off to height.
End Caps: I required to protect the close of the dog spikes from destructive whatever floor surfaces when walking. I managed to modify the existing heel caps to sour with my new design.
Step 2: Blackguard Breakdown
...
I'm sure every last ladies place are factory-made in a analogous fashion. Your shoes May be slightly different in structure and Crataegus laevigata require a different method than the ones shown here for adjustment.
I started past removing the small plastic houn cap with pliers, past bisected the decorative leather sole at the cad and distant the sole portion that was glued to the heel. Making sure not to damage the heel veneer, the white heel covering was peeled indorse and removed. Set aside this scrap for later as we'll be using it in Step 6 to cover the underside of the skid where the old heel secondhand to be.
The heel of these shoes were held on with a large industrial cleat that mechanically fast the dog to the sole and adhesive. The cleat was related to from the top of the horseshoe under the insole through the unshared and embedded profound in the pliant heel. It was zero belittled undertaking removing this cleat. I worked for about 20 minutes acquiring these heels off.
Once removed the darkened pliant heels can be throwaway.
...
After the cleat and dog are removed information technology's time to prepare the shoe for welding.
This shoe has a brand shank low the innersole for suffer, my shoe had the shank riveted to the insole, so the full insole was remote from the shoe. The undersurface of the shank was abraded at the dog with a synchronous converter creature, this will clear away any debris and devise the surface for accepting a weld.
The heel cleat opening left a notched edge which needed to be fixed. I easy cold shoulder away excess shoe around the cleat opening and so reinserted the shank-insole back into the shoe to approximated where I was going to weld my spick-and-span steel heel empale, the young heel location was marked on the nerve shank with ineradicable marker.
Tread 3: Cut back and Attach Foam and Lenses
I wanted to give these shoes a toe treatment with some elements distinctive to R2D2, principally his 2 lenses, blinking light and blue accents. All these elements are glued to the brake shoe toe. (tip: to ensure proper adhesion select areas of the two-toe were softly roughed up with sandpaper to remove the high-glossiness finish).Here's how I made each of these elements:
large lens:
R2D2 has one large, dark lens. Since my heels will have unmatched of these on both toes I used a nickel-and-dime pair of sunglass lenses. The lenses popped retired of the frame easily and I copied a large dress circle shape using a mint. The circular shape was turn out exploitation a rotary tool. I used a strong grammatical construction adhesive to affix the large lens to the toe, the adhesive is partially stretch and allows extraordinary flex which will prevent the genus Lens from popping off when being worn.
blue accents:
I couldn't find some fizz sheets in the blue hue I wanted, but they did have a foam cowboy hat that was the thoroughgoing colour. I cut out the flat brim and derived R2D2's head accents, and then cut them proscribed with scissors. The blue accents were glued onto the horseshoe toes using a "foam paste" I found at the craft store. This glue looks like Caucasian glue, but less viscus and sort of melts the foam a little to create the bond. This gum too about a day to completely cure, so masking paper was used to cargo hold the foam in situ.
small extruded lens:
I used the focusing Lens of two small flashlights I got from the Dollar Computer memory. The flashlights were broken down and the lens and black housing was pasted to the two-toe using flexible construction adhesive.
blinky light: see next step
tip: adhering the elements to the pointy-toed was very time consuming due to long hardening multiplication and the kickshaw of work. Each component was done singly and were individually fixed or clamped belt down piece glue was curing. Be patient with this part to ensure good prime results. I do not recommend using allegro-set epoxy as the accelerated curing time reduces the effective bond.
Maltreat 4: Blinky LED Circuit
These shoes also take over R2D2's signature blinking Light Within for added genuineness. The wiring is a simple circuit that has a switch to function, same violent blink LED, and is high-powered past one 3V coin cell battery.
switching + battery:
The shelling bearer has two prings happening teh backwards, these prongs were lined up on the underside of the brake shoe next to where the new heel will be set. Small openings were poked into the underside of the skid to facilitate wiring. The switch over was connected to one terminal of the battery holder then wires were soldered to the remaining battery terminal and unmatched slope of the switch. The wires were fed through the openings and the switch and battery assembly was then epoxied in place.
LED bearer:
The LED holder I used was a polished metal, a perfect addition. However the threaded mounting neck opening was much too long and would be uncomfortable to the wearer when installed. The mounting nut was tightened so the neck was shortened using a rotary converter tool. Backing off the climbing nut completely ensures the threads are retained.
A drill was used to drill through the fizz and shoe to create an opening to mount the LED holder. After installing the LED holder the mounting bracket was threaded back on to secure the holder.
LED's:
I chose to flatten the crest of my 5mm red LED's to they sat rosiness when inserted in the LED holder. Using a rotary tool around the LED tops were shaving down to about 2/3 their original height. The legs of the LED were bent at 90 degrees and wired to the circuit.
wiring:
After the elements take up been installed the excess wiring force out be affixed down exploitation small dabs of hot glue. I as wel chose to add a small scrap of mild cloth to the in spite of appearanc of the toe to cover the wiring and protect toes from detrition against whatsoever exposed wiring.
Step 5: Welding + Painting
...
welding:
The original heel for this shoe had a wide flange at the heel which helped funding the width and weight of the heel and foot. This new design calls for a slender, uniform heel spike and will necessitate a weapons platform to bread and butter the wearer's weight unit in place of a wide-cut flange care the freehanded.
A small heel platform was made from scrap 1/8" sheet steel. I put-upon an angle grinder to cut out jagged rectangles, and then amygdaliform the corners until I had a platform that fit inside the insole. The platform was and then welded to the nerve shank.
The 1/4" stainless steel bolts were then lined up and tacked in set to ensure position was proper. Spell the bold is put together welded connected is a blast to make some minor adjustments to the fish of the bolt. It helped to put the insole and shank back in the shoe with the tack weld to ensure the heels are perpendicular to the dry land. When alignment is ensured, weld the bolts in billet for both shoes.
clipped heel spike to duration:
After welding the insole and cannon was put back into the brake shoe with the dinosaur located along side. The dog spike was then cut to be active 1/4" longer than the height of where the dinosaur back will meet the shoe.
painting:
After welding the insoles were masked and the heel was primed and painted with 2 coats of matte white
Step 6: Cover Alligatored Edges + Glue Insole
...
Remember the bounder covering I asked you to set aside in Ill-use 2? We're going to utilisation them here.
Using the rusty heel covering I covered the underside of the brake shoe and trimmed to jibe. A undersize opening was then made in the covering for the new blackguard spike.
Using heavy-duty rubber cement the painted reheel insoles were affixed into the brake shoe anatomy. They were clamped in place and left to therapeutic nightlong. These insoles neatly cover the installed wiring.
Step 7: Heel Gathering
Rising on my previous design I definite to try and reuse the existing blackguard caps. Since these heels started with a wide heel base and were transformed into a more than thinner heel I was able to make two newfangled heel caps from just one of the originals.
The heel crownwork was first bisected using a circular puppet. Material possession the hex nut with pliers the nuts were heated using a propane torch, when red-hot the nuts were pressed into the plastic of the heel cap, making a dental caries the exact shape of the hex nut. I inserted these barmy roughly 3/4 into the cap. The hex daft were removed and the plastic and bollock were set aside to cool. Victimization a rotary converter tool and hobby knife the edges of the heel cap were cleaned up and the small island in the centre of the cavity was trimmed thrown to tolerate the threaded heel to beryllium fully inserted.
The hex nuts were then primed and painted with 2 coats of matte white key.
Spell the paint was drying each heel hap was then cut down in size and shaped to a smaller, rounded cap, about 3-4mm (1/8") offset from the diameter of the hex nut.
Later on the key was teetotal the hex cracked were epoxied into the heel cap and the forum was then epoxied and threaded onto the heel spike.
Step 8: Adding R2 Unit + Install Padded Insole
R2D2 is cylindric and doesn't have geometry that lends itself to well attaching to some other cylindrical aim (the heel spike out). I made a valley in the back of each R2D2 away using the shaft of my soldering branding iron. crown: this is a smelly process, make a point you are operative in a healed ventilated area.
While the soldering iron is still hot make a point yo wipe out off the plastic that has melted to it before information technology Robert Burns connected there for good. I made these valleys as deep Eastern Samoa I could before I hit the electronics and batteries inner. The valley doesn't have to totally conceal the heel but necessarily to be abysmal enough to allow good adhesion between the toy and the heel spike.
Each toy was so positioned in the correct spot on the reheel, facing back, then epoxied in place. These were taped in situ and the epoxy was left to cure all-night. After, the cushiony insoles were installed with a small tap of rubber cement.
Step 9: These ARE the Droids You're Looking at For
With the epoxy set and the cushiony innersole inserted these shoes are ready for adventure!
All that's larboard to do is:
- flick the switch where the houn meets the lone to make the LEDs blink away,
- press the button connected the toy to work R2D2 make sounds and light up,
- save the galaxy.
Have you ready-made your own shoes inspired by this labor? I want to go out it!
Elated making :)
1 Person Ready-made This Project!
Recommendations
Source: https://www.instructables.com/R2D2-heels/
Posted by: mackwently99.blogspot.com
0 Response to "R2D2 Heels : 9 Steps (with Pictures) - mackwently99"
Post a Comment